Easy Holiday Entertaining

I’m back! We are finally all settled in our new home. I promise that I will post photos and some details on my decor very soon. Thanks for patiently waiting for the next STYLEgloss!

All this packing and unpacking made me forget just how close we are to the holiday season— I mean Halloween is less than a week away. That means Thanksgiving is right around the corner and so are all the fixings that come along with it.

I really enjoy entertaining and cooking for a crowd, although I admit it sometimes does get overwhelming. Whether you are hosting your family’s annual Thanksgiving feast or just inviting a few friends over for wine and cheese I have some great tips and products to make it all a bit easier. Here are my picks for entertaining and ideas on simple get-togethers– any excuse for a party!

D E C O R

Screen Shot 2015-10-25 at 4.19.16 PM

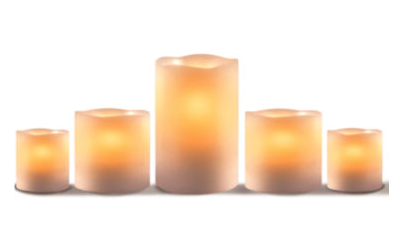
Creating a beautiful Pinterest-inspired tablescape can not only be super time consuming but it also not always practical. If you are serving a big meal you still want lots of room for all your serving platters and place settings. In this case I think less is more. I love the soft ambient lighting that you can only achieve with candles. This five piece flameless set is awesome because you can create a beautiful centerpiece of scatted tablescape just by adding a few silk leaves or flowers. Flameless also gives you piece of mind not having to worry about any of your gusts knocking into them as they pass the turkey.

A  S I M P L E  S T A R T

Screen Shot 2015-10-25 at 4.17.54 PM

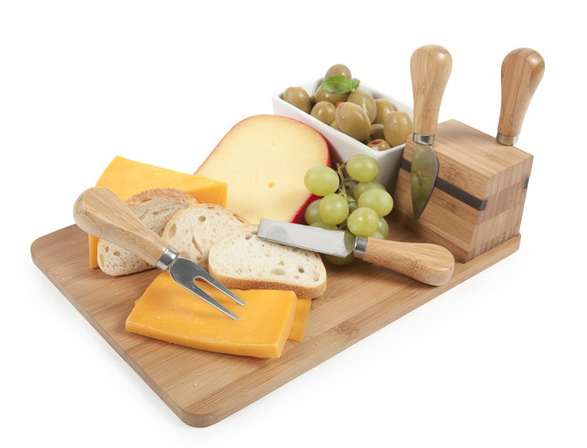
A cheese board is the ultimate appetizer for any get together. Something as simple as cheese and crackers can be elevated to an elegant starter just through presentation. This cheese board serving set is convenient and takes the guess work out how to create a beautiful display. Keep cheese, crackers and a bottle of wine on hand throughout the season so that you can throw together this simple board when unexpected company drops in.

Host tip: When creating a charcuterie and cheese platter you want to maintain balance. Select 3-5 varieties of cheese (hard, creamy, nutty, sharp- the more variation the better) and pair with cold meats like prosciutto, speck or salami.  Add salty cured olives, nuts or grapes plus crostini to complete the platter. 

W I G G L E  R O O M

Screen Shot 2015-10-25 at 4.20.02 PM

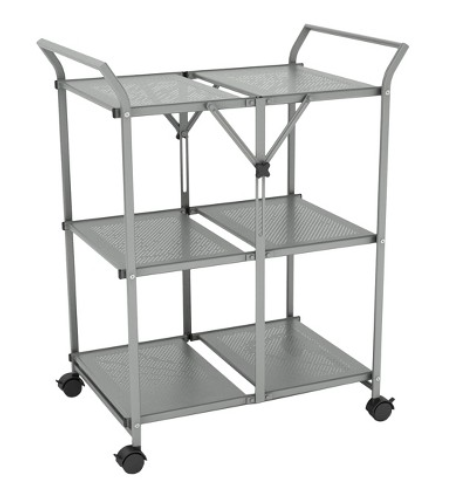
This foldable cart is perfect if your kitchen is lacking in extra counter space or you just need a little extra room. It stores flat so it takes up virtually no room when you are no using it. Create a baking station closer to your oven or use it as a coffee and dessert cart. It is super affordable and comes in four colors!

Host Tip: How fun would it be to roll in a cart filled with sweets from top to bottom when it is time for dessert? Display cakes, cookies, candy and mini pastries on the top two shelves and dessert plates, forks and knives on the bottom. 

S W E E T  E N D I N G

Screen Shot 2015-10-25 at 4.21.43 PM

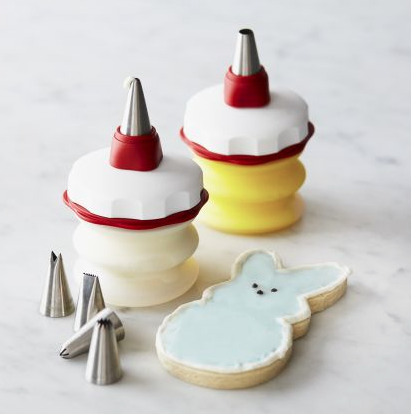
If your home is anything like mine, holidays are always associated with baking– a lots of it! Create beautifully decorated cookies and cakes with these insanely easy to use silicone decorating bottles and tips. I love using these on even the simplest of cupcakes to make them feel just a little bit more special.

Host Tip: Bake box mix cupcakes in pretty holiday-themed liners. Pipe store bought frosting onto each cake using one of the bottles and tips from the set above. Finish with sparkly sprinkles like these to dress up your average cupcake! 

Screen Shot 2015-10-25 at 4.20.22 PM

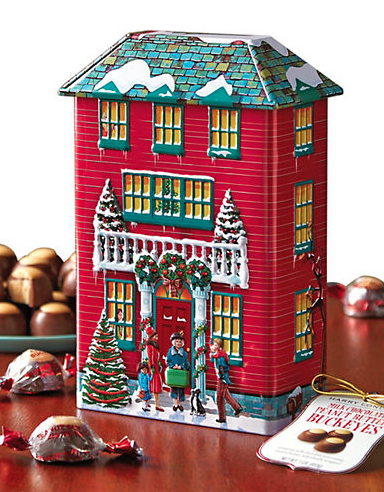
Harry London chocolates are essentially synonymous with the holiday season. This pretty tin filled with delicious buckeyes is a fun way to serve a sweet treat after dinner or makes a great hostess gift if you are visiting friends. I like to keep a few on hand each year.

E X C E P T I O N A L  S E R V I C E

Screen Shot 2015-10-25 at 4.21.20 PM

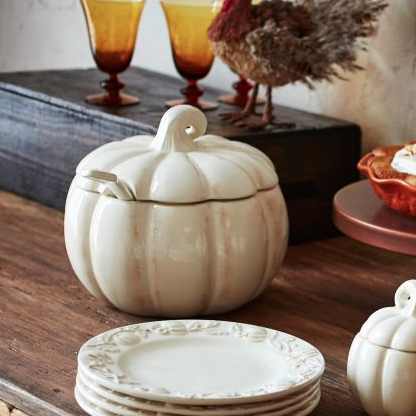
This pumpkin tureen does double duty- it looks pretty on your table and it can also be used as a:

 wine chiller– just add ice.

punch bowl– try this apple pie sangria recipe!

 self-service soup pot– be sure to place a bowl at each table setting.

centerpiece– add silk or fresh flowers.

S P O T  O N

Screen Shot 2015-10-25 at 5.03.28 PM

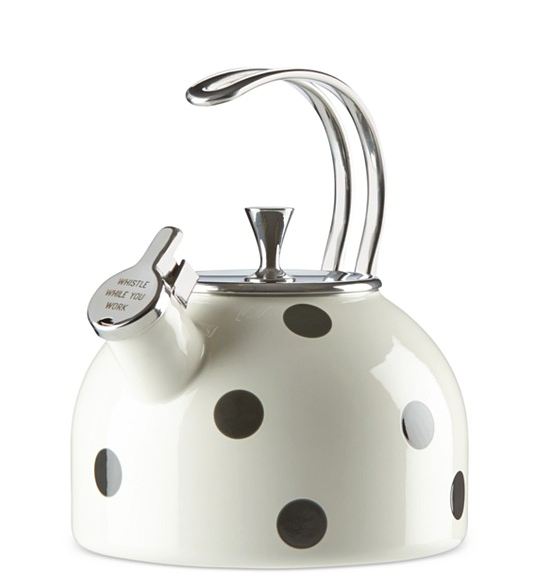
How adorable is this teapot? It is a piece that you can keep on your cooktop all year long but also is a beautiful way to serve your guests tea during dessert.

G E T  C O O K I N’

Screen Shot 2015-10-25 at 5.05.00 PM

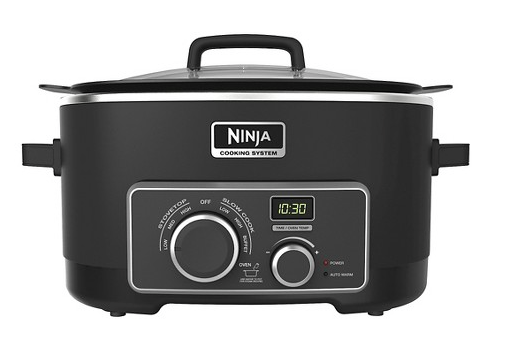
Allow me to introduce you to the world’s best kitchen sidekick– The Ninja! You can use this as a stovetop, a slow cooker or a roaster. Slow cooking allows you to free up your oven (especially if your turkey or ham is hogging all the real estate) and helps to pace your prep prior to dinner. I use my slow cooker at least once a week in the winter– it is a great kitchen staple that you won’t regret investing in.

Screen Shot 2015-10-25 at 5.10.19 PM

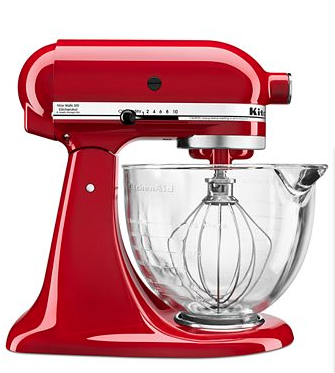
Many of you may already have a KitchenAid mixer and you know just how easy it makes life. If you don’t have one or need to upgrade my advice is… do it! You will be so happy you did.

S I M P L E  G A T H E R I N G S

Here are a few fun ideas for fall and holiday soirees…

pumpkin carving party 

potluck friends-giving

harvest dinner

holiday cookie exchange 

gift wrapping get together

What tips or tools make your life easier during the holiday season? Share them with me! #STYLEglossblog.

Nom: Savory-Sweet Tomato Jam Jar

I’m going to let you in on a little secret about me.

I don’t like raw tomatoes.

Seriously. Can’t eat ’em. I’ve tried tons of times, but I just can’t get past the texture and the taste.

But cook them up in a sauce, give me a bowl of salsa and chips, add them to a deliciously sweet and sticky jam and I’ll eat that up. Twice.

I first discovered the holiness that is tomato jam at Nordstrom’s Sixth and Pine restaurant. It was nestled delicately into a glass mason jar along with pesto and ricotta… hence the name tomato jam jar. Seriously, horns will play and angels will descend from the high heavens when you taste this recipe. It is that good. I promise you will want to make it for every birthday, holiday, payday and all the other days in between.

Plus, it is a super easy and elegant appetizer that you can impress all your foodie friends with. They will think you slaved over a hot pot and a cutting board all week.

There is no better way to use all of those home-grown tomatoes from your garden that you have right now than to make tomato jam. You can jar it and feast on your crop all winter long (how Home on the Range is that?).

Now don’t get nervous but there are a few moving parts to this recipe. You’ll need to make the jam first, which is the most time consuming part. The rest is cake!

Here is what you’ll need:

Tomato Jam Jar Ingredients:

for the jam

  • 1 ½ pounds ripe Roma tomatoes
  • 1 cup white sugar
  • 1 tablespoon fresh grated ginger
  • ¼ teaspoon ground cinnamon
  • 1 teaspoon salt
  • red pepper flakes to taste
  • the juice of one lime

for the crostini

  • one loaf crusty Italian bread
  • 1/2 a stick of butter

other ingredients: 

  • 1 teaspoon white sugar
  • 1/2 cup ricotta cheese
  • store bought or homemade basil pesto

Here is what to do, step by step (with pictures!)

STEP ONE: Preheat your oven to 350. Core your tomatoes. I like to use a teaspoon to do this. Another great tip is to take the produce bag your tomatoes came in and insert it into a plastic mixing bowl. Core each tomato over the bag and then just toss when you are done for easy clean up. Genius.

FullSizeRender

When you have cored each tomato they should look something like this…

FullSizeRender_1

STEP TWO: Rough chop your tomatoes and place (or throw… no judgement here) into a pot.

FullSizeRender_2

STEP THREE: Add all your other ingredients to the pot and mix. Cover and cook on medium heat, stirring occasionally for about an hour or until your tomatoes begin to look glossy and the sauce thickens.

FullSizeRender_3

STEP FOUR: Once your tomatoes have taken on a jam-like consistency you need to make sure they are cooled before plating. Take a tray (a baking sheet will do) and line it with parchment paper. Spread your jam in a thin layer and refrigerate until cool.

FullSizeRender

STEP FIVE: Your guests (or just you— again, no judgement here) will need to spread the ricotta-basil-jam mixture on something equally as delicious, so let’s make some crostini. Cut a loaf of crusty Italian bread into thin slices and place on a baking sheet. This step is optional. Bagged crostini from the bakery or deli at your grocery store would be just a good!

FullSizeRender_1

STEP SIX: Melt a half of stick of butter and brush onto your slices of bread.

FullSizeRender_3

Bake the bread in a 350 degree over for 12 minutes. It’s done when the edges are browned, like this…

FullSizeRender_4

STEP SEVEN: Mix one cup of ricotta cheese with a teaspoon of sugar and “whip” with your spoon until the mixture is creamy and smooth. Now layer your ricotta on the bottom of a glass jar or small glass bowl like this one. Add a layer of basil pesto (you can make your own or you can pick up pre-made pesto from the grocery store. I used this one). Lastly, add a layer of your tomato jam! It should look something like this…

FullSizeRender_2

Serve with your crostini and watch your friends go crazy over this insanely delectable combination of flavors. You can also transform this into a sweet treat by replacing the pesto with a layer of almonds and the tomato jam with peach or strawberry jam. If you wanted to try your hand at a homemade fruit-based jam this is a great recipe.

Also, how gorgeous would this look on your holiday table?! It is never too early to start planning!

FullSizeRender_1

Mangia! 

Nom: Stuffed Garlic Bread

It’s not too much of a secret that cooking isn’t my favorite thing to do. I don’t dislike cooking. I just hate doing the dishes afterwards. 

But when I do cook, I usually bring it. I put my game face on and aim to impress. I pretty much accomplished that tonight with this recipie. 

You can totally impress your friends and family too. This super simple garlic bread requires little skill to prepare and the finished product is delicious. Make it for yourself and see… 

You’ll need: 

– 1 loaf of soft Italian bread (fresh is best) 

– 1 stick of butter 

– 5 slices of mozzarella cheese (you can also use shredded but I find that sliced is easier to work with in this case) 

-2 Tbs. garlic bread seasoning (I used this one) 

So this recipie starts out with a pretty innocent cast of characters. My trusty knife, cutting mat and a fluffy loaf of fresh bread.

Oh, and with you preheating your oven to 350.

  
I start by slicing my loaf on a diagonal. Don’t slice it all the way… More like 3/4 of the way. You want to keep the loaf intact. 

Once you have sliced down the loaf turn your knife and slice the opposite way so that you create a criss-cross design. 


Now take a rest. I know all the slicing really hurt my hand, so much so that I needed my husband to take over. He then pointed out that I was using the wrong kind of knife, so I guess disregard my first photo and use this bread knife instead. Oops! 

Now that you are well rested open up your stick of butter and add it and your 2 Tbs. of garlic bread seasoning to a bowl. Microwave for 60 seconds or until your butter looks like this… 

  
Now it’s about to get serious. Hold on to your seats, kiddos! 

Mix up that butter until it is mostly melted and it looks dark green. Spoon the mixture into the cuts of the bread. You’ll have to use your fingers to separate the bread, like this: 


Fill up each cut with the butter. By the time you are finished it should look something like this… 

  
Try not to lick the screen. 

It’s time to add the cheese! I pretty much rip my slices up into small pieces with my hands and stuff then into my cuts as I go. Fill up your bread to the max. Cheese makes everything taste better. 

  
You are nearly ready to eat this delicious masterpiece. But not yet. We still need to cook it! 

Wrap the loaf in aluminum foil (cover the top) and bake for 15 mins. Remove the tin foil and bake for an additional 5 mins, or until the top is golden brown. If you are really adventurous you can add a little shredded cheese to the top just before taking it out of the oven. 

  
All finished! I served mine with tortellini but this could be just find as an appetizer or with pizza and beer. You don’t need to be so fancy. Besides, it probably won’t last more than a few seconds. 

Be prepared for your family to oooh and ahhhh over this culinary work of art. They will think you are so amazing and will start to believe that you are qualified to be a contestant on Master Chef. You’ll have to remind them that it’s just the cheese talking. 

  
Seriously. Make it for yourself and see how addicting it is! 

Low Carb Apple “Pie” Parfait

Apples are the yummiest dessert ingredient. Given the choice between an ice cream sundae, chocolate cake or apple pie I will ALWAYS choose the pie! I always think of fall as the kick off the the year’s BEST and most fattening six months. Between pumpkin spice EVERYTHING (donuts, muffins, lattes- oh my!), Halloween candy, Thanksgiving stuffing and Christmas desserts, it’s no wonder our pants don’t fit after January!

This apple “pie” parfait is simple to make and is crustless! Enjoy the taste of apple pie (yes, even the crunch of a crumb topping) without the calories and guilt.

Apple “Pie” Parfait 

Ingredients:

1 Granny Smith apple

4  packets of Splenda

1/4 cup of water

1 Tbs of butter

1 tsp of cinnamon

1/4 tsp of vanilla extract

1/4 tsp of nutmeg

dash of salt

lite whipped topping

granola of your choice

Method:

1. Peel and core your apple. Typical apple corers give you eight pieces. Go ahead and cut every piece in half, giving you 16 slices when you are finished cutting.

2. Put your apple slices in a bowl. Add cinnamon, nutmeg, vanilla, Splenda and salt. Toss to coat.

3. Melt butter in a frying pan. Add apples. Stir to coat with butter. Add water to pan and cover. The water will keep the apples from drying out.

4. Let apples cook on LOW heat for about 25 minuets or until tender (not mushy!)

photo 1 (1)

5. When your apples are done remove from heat and place 5 slices in a small, shallow bowl. Top with a small sprinkling of granola (seriously 1/2 a teaspoon is enough! You WILL taste the crunch!) and then a dollop of whipped topping. Repeat one more time.

6. Enjoy the amazingness of this guilt free dessert.

Serves two!

These little bowls are from Pampered Chef. They are the 1 cup prep bowls and come in a set of 6!

These little bowls are from Pampered Chef. They are the 1 cup prep bowls and come in a set of 6!

Thanksgiving in July

Thanks to the nature of the fashion industry I am always a season or two ahead. As everyone is enjoying the summer sun this week, I am already focused on buying fall clothes for my store and (starting in August) prom dresses for the spring of 2015!

It’s not my fault that all I can think about right now is fall- especially when I keep hearing the words “Christmas in July” being thrown around this month. That means we are SO close to boots, sweaters and PUMPKIN EVERYTHING!

Since I am dreaming of pumpkin muffins and lattes, I thought I could satisfy my cravings by making a feast of comfort food that incorporated one of my favorite fall dishes.

I have a soft spot for sweet potato casserole– you know, the kind with all that gooey brown sugar and marshmallows? Sure, you could pick up a whole batch of this delicious piece of heaven at Boston Market on your way home, but this homemade version is just so much better! I love this recipe from Rebecca Lang’s Around the Southern Table. In fact, I love her whole book! Download it now or pick it up at your local bookstore and you will instantly see why it will become a go-to in your kitchen.

The one thing that I changed about Lang’s version of sweet potato casserole was the topping. She uses crushed gingersnaps to create a crumbled topping but Chris doesn’t care for them. Instead I made my own crumble (recipe below). It is a generic recipe that I think everyone should know how to make. You can use this topping for tons of things- cobblers, crumb cake, crust-less apple pie. The best part is that it is easy to make and even tastier to eat!

Not sure what else to serve with your sweet potato casserole when it’s not November? I made fried chicken and herbed biscuits to go along with it! All recipes were from Lang’s book.

Stephanie’s Simple Crumb Topping:

1 stick of butter (softened- NOT melted!)

1 cup flour

1 1/2 cups packed brown sugar

1 teaspoon of nutmeg

1 Tablespoon cinnamon

Method:

Mix together flour, brown sugar, nutmeg and cinnamon so that your mixture is a light brown color. You should not see any white spots. Add your butter by mixing it into your dry mixture with your hands. You should eventually see the mixture turn into what looks like crumbs or crumbles. Use this topping for pies, cakes and cobbles . Simply top your dish with it prior to baking.

Variation: Add 1/2 cup oats or honey granola for more texture.

Make your casserole ahead of time! Prepare the base and then make your topping just before you are ready to bake.

Make your casserole ahead of time! Prepare the base and then make your topping just before you are ready to bake.

PS: My casserole dish in the photo above is Temp-Tations from QVC. The whole line consists of stoneware pieces that go in the oven, microwave, dishwasher and are pretty enough to serve from. This color combination was a spring limited edition but this set is the same one I have, just different color options.

Lemon Glazed Biscotti with Cannoli Cream

Fresh from the oven and ready to glaze! These biscotti are slightly browned at the edges but are still chewy!

Fresh from the oven and ready to glaze! These biscotti are slightly browned at the edges but are still chewy!

Looking for an easy dessert that travels well and will impress your family and friends? These lemon glazed biscotti are perfect! They are best served fresh-from-the oven so that they are warm and chewy, not hard and crunchy like typical biscotti. My husband’s recipe for cannoli cream is a great compliment to these cookies.

The warm cookie against the cool and creamy cannoli filling tastes like heaven in your mouth. If you serve this at your next party your guests will think you slaved over a hot stove and a KitchenAid all day but the truth is this dessert is super easy to make! Here’s the recipe and some tips from me to help you along!

Lemon Glazed Cookies

For the cookies:

½ cup unsalted butter (softened)
½ cup white sugar
2 whole eggs
2 tablespoons grated lemon zest
2 tablespoons vanilla
2 cups all-purpose flour
1 teaspoon baking powder
¼ teaspoon salt
1 cup toasted silvered almonds

For the glaze:
1 1/2 cups powdered sugar
3 tablespoons fresh lemon juice
1 tablespoon milk

***Cannoli cream recipe is below**

Method:

Preheat your oven to 350 and prepare a baking sheet in your favorite way. I like to use cooking spray but you could line with parchment paper or use butter.

As with most cookie recipes start out by mixing dry and wet ingredients separately. Cream your butter and sugar with a hand mixer until it is light and fluffy. If you under-beat these two ingredients your cookies will be grainy- do not skip or skimp on this step! Add your eggs, one at a time. Then add the lemon zest and vanilla. Set this aside and take out a new bowl to prepare your dry ingredients.

Sift your flour, baking power and salt together. Slowly add this mixture to your wet ingredients (about one cup at a time, stopping to mix it in entirely before adding another cup). Mix in almonds (don’t forget to toast them before!). Your dough will be slightly sticky- that’s OK! Your cookies will still come out just fine!

Lay your dough out on a floured surface and knead until the dough holds its form. Then separate the dough into two portions. Form two logs on your baking sheet. Bake for 25 minuets (don’t forget to set a timer- this is important).

After 25 minuets of baking it’s time to actually make your dough into cookies! Take your logs out of the oven and lower the temperature to 325. Let the logs cool slightly on a cutting board for about 5-10 minuets. Take a sharp chef’s knife and cut your log into strips, creating your cookies. This recipe makes a small batch (NOTE: double this recipe if you are feeding a crowd!) so I like to cut mine on the thinner side. There is no right or wrong way to cut them.

Place your cookies back on the baking sheet and bake for 5 minuets on each side, for a total of 10 minuets. Let them cool slightly (so they are not burning hot but still warm). Prepare your glaze by mixing all of the ingredients in a small bowl. It should be thick but still look and pour like a liquid. Glaze each cookie on wax paper and let dry.

Transfer to a tray and serve with cannoli cream (see below).


Cannoli Cream

3/4 of a large container of ricotta cheese- do not use part skim! (approx. 32 ounces)

2 small containers of mascarpone cheese (approx. 16 ounces) *NOTE: You can find this Italian cream cheese in most supermarkets. If all else fails try an Italian specialty shop- they are sure to have it.

1/2 box of powdered sugar (approx. 2 cups)

1 bag of semi sweet chocolate chips

2 Tablespoons vanilla

1 cup water

2 Tablespoons cornstarch

1/2 cup white sugar

Method:

The best part about this recipe is that most of the measurements are either the whole or almost the whole container, so you can just throw it into your stand mixer without measuring anything out! Start off by mixing your ricotta and mascarpone cheese together. Add vanilla, then add the powdered sugar. Your mixture will be sweet, but not sweet enough yet!

We will need to thicken and sweeten the cheese. In a bowl mix together your water, cornstarch and white sugar. Add to the cheese mixture. Everything should begin to thicken. Here is where you will need to exercise a little cooking creative freedom… If you feel like your cream is still too loose (it should be stiff enough to scoop up but creamy enough to spread as  you would a frosting) add another tablespoon of cornstarch mixed with three tablespoons of water. If you feel like it is not sweet enough do the same with your white sugar and water (in the same proportions). Do this until your mixture looks creamy enough and is sweet to your liking.

Let the mixture chill for at least a half hour before serving. I like to let it sit overnight, but if you are making it the same day as your event a half hour will do.

Sit back and enjoy as the endless compliments come in!!